The Perfect Patchwork System
Rotary cutting and strip techniques revolutionized patchwork, and From Marti Michell Perfect Patchwork Templates take the revolution a step further. Their revolutionary corner concept by Jane Hackworth Gruchacz means cutting pieces that match perfectly – no pinning or guessing required, and no more "dog ears" ensnared by the throat plate or shadowing through light fabrics. The thick acrylic templates mean you can rotary-cut multiple layers of fabric at one time. Combined with perfectly-sewn ¼″ (6 mm) seams and the block patterns in this book, you'll be making more quilts, more easily and more quickly!
Perfect Patchwork by the Numbers
You don't have to do the math--we've done it for you! Our templates include 1/4 inch seam allowances and corners are designed to match perfectly. Our multi-size tools have cutting guidelines that include seam allowances and blunted corners so you can nip those shapes for perfect matching.
We think of Sets A through E as our basic geometric sets. The templates in Set A are based on a 3″ (7.6 cm) finished square and its most common component parts. Those in Set B are the same geometric components of a square, but are based on a finished 4″ (10 cm) square. Any patchwork block you can make with Set A templates can also be made with Set B; it will just be larger. Sets C and D include additional shapes that complement the shapes and sizes in Sets A and B.
Every template has its own unique permanent identifying number. For example, Set A consists of templates 1 through 7, Set B is 8 through 14, and so on. At the present time, the alphabetized sets go to Set T, and we have a variety of design-specific sets such as Giant Dahlia, Mariner's Compass and Hunter's Star, as well as many old favorites like Double Wedding Ring and Grandmother's Flower Garden.
The versatility of the basic geometric sets means you can make several block sizes from each set of templates. The block collections in the Encyclopedia of Patchwork Blocks volumes are keyed numerically for use with the corresponding Perfect Patchwork Templates. You can see the blocks in the Patchwork Block Index PDFs that are available here on our website under "Extras."
Cutting Tips
The Rotary Cutter and How to Use It
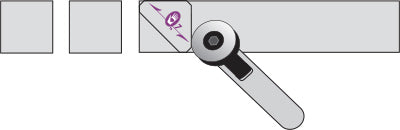
The assumption has been that everyone knows what a rotary cutter is. In case you don't, it is a cutting device, invented in 1979, that looks like an advanced pizza cutter. It must be used in conjunction with a special protective mat under the fabric. The popularity of the rotary cutter skyrocketed when it was coupled with thick acrylic rulers for long smooth cuts. At the time this is being printed, there are generally 3 sizes of rotary cutters available. Most often, I use the medium cutter (which was until recently the large cutter).
- Rotary cutter blades are very sharp. A fresh blade will easily cut six to 12 layers of fabric with very little pressure. Bearing down too hard is not necessary and can do irreparable damage to the protective mat. Most people are content with 4 to eight layers.
- Make sure the rotary cutter you buy has a blade guard. Make sure the guard is in place when the cutter is not in use. This protects both you and the blade. If you drop the cutter or accidentally cut across a pin, the blade often becomes nicked. Then it perforates more than cuts the fabric, an annoying process. The blades are replaceable, but the need can be minimized by keeping the guard in place.
- When cutting strips, the blade side, not the guard side, goes immediately next to the template or acrylic ruler.
- Cut away from you, not toward your body. Watch those fingertips! Do not let them extend over the template or the cutting side of the ruler!
Start with Strips
No matter which shapes you are cutting, it is most common to first cut a strip that is the same width as one dimension of the desired piece, then use the template to create the desired shape. The strip cutting charts on the inside covers of Volumes 1 and 2, and in More Bang for the Buck feature measurements and assume the use of a standard 6″ x 24″ (15.2 x 61 cm) acrylic ruler to measure and cut strips. Necessity truly is the mother of invention! When the strip widths on Set L came out to sixteenths and thirty-seconds of an inch, it caused an obvious realization – Use the template to measure the width of the strips!
The template is the exact size, and it is a measuring tool. It just isn't what we are used to calling a ruler. The technique is shown below, illustrated with templates from Set A. Use squares for measuring strip widths when possible. Refer to the strip charts in Volumes 1 and 2, and More Bang for the Buck to select squares when cutting triangles.
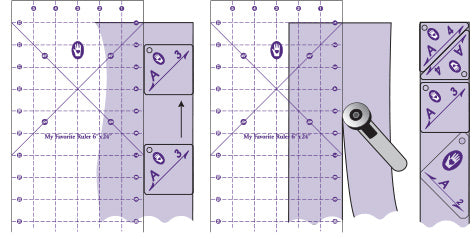
Straighten the edge of the fabric, and align the template with the raw edge. Place your ruler against the template to mark the cutting edge. Slide the template along the raw edge to be sure the ruler is aligned correctly, then remove the template and cut the strip.
- Place the template on the strip to cut the shape. Don't forget to slip a small cutting mat under the strip as you cut the shapes and nip the corners.
- The desired grainline affects the orientation of a triangle template on the strip and, thus, the width of the strip.
It is not uncommon to use the same triangle template with the straight grain on the hypotenuse and with the straight grain on the leg in the same block. Think piece by piece and make the best decision for each position in the block. Using a non-directional fabric allows you to alternate the base of the template to the opposite edge of the strip to cut every other piece, which conserves fabric.
Even More Cutting Benefits
Because of the added benefits of using the templates to measure strip widths, I have switched to this approach with all the sets. Measuring this way means:
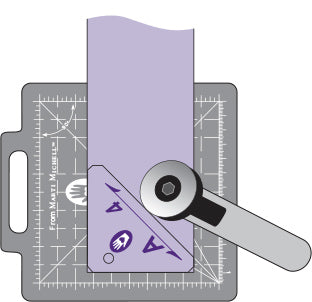
- I use the same edge of my ruler to straighten the fabric and cut the strips, eliminating the need to move around the table or rotate fabric.
- The large ruler is on the uncut fabric. You can move the cut strip and assure a complete cut before you move the ruler. If two or three pesky threads did not get cut, the ruler is still exactly where it needs to be!
- The ruler is flat on the fabric, not rocking between the levels of the mat and the fabric.
Template Tricks
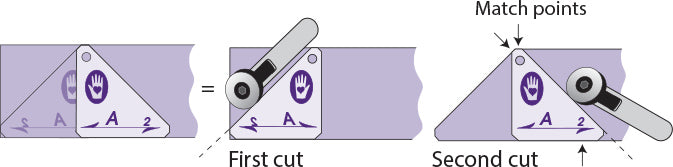
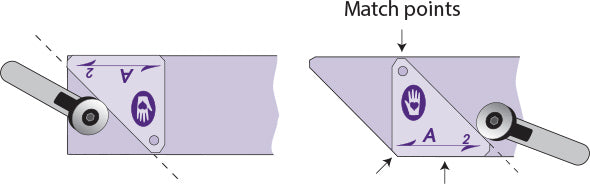
In many block patterns, you will find two right triangles cut from the same fabric and sewn together, back to back. Often that seam can be eliminated. In our books this has been done where appropriate and is marked in the template designator boxes; for many of the 12″ (30.5 cm) or 16″ (40.6 cm) blocks, the largest right triangle in the set must be flipped to create the larger unseamed triangle. The good news is that the uniquely engineered corners make some clever tricks possible.
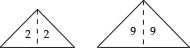
Make Bigger Flying Geese-type Triangles
In some blocks you will see one of these symbols in the template designator boxes:
To cut the larger triangle and eliminate the seam, make the first diagonal cut. Then flip or rotate the template and align it with the straight edges and the corner angles to make the second cut.
Many people requested templates the same size as the 2+2 and 9+9. The multiple-size From Marti Michell Flying Geese Ruler includes those sizes.
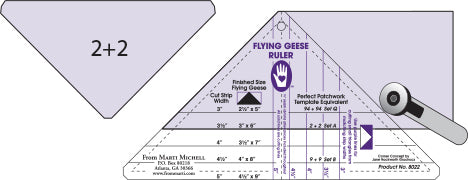
(Since the basic geometric sets were introduced, we have added the full size
of the most common "plus" triangle sizes to the Flying Geese Ruler #8022.)
Cut a Square with Any From Marti Michell 90° Right Triangle
Some infrequently used squares, for example 1⁹⁄₁₆″, do not have size-specific acrylic templates. However, if there is a From Marti Michell 90° right triangle template whose leg measures that size, you can use it to cut a square that size.
This trick is illustrated with template A-7, which has a 1-9/16" leg. Use the template to measure the strip width. True up one end of the strip. Put the blunt template corner against the trued-up end and cut along the vertical leg. As you cut, you also true up the new end of the strip. Repeat as needed. Be sure to nip the corners of the squares.
This trick will work with any 90° right triangle with From Marti Michell engineered corners.
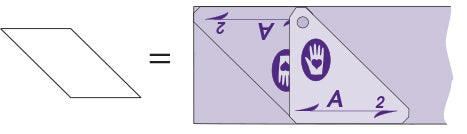
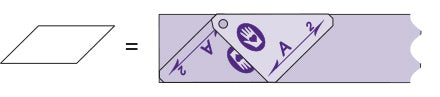
Make Fake Diamonds
Two right angle triangles (see Clay's Choice in the Patchwork Blocks Index for Volume 1) may look like they combine to form a diamond, but they really make a parallelogram, or a "fake diamond." Often the seam between the triangles can be eliminated. Parallelograms are asymmetrical. The nature of geometry is that you can make parallelograms with two right triangles by overlapping one leg or the other. In the first orientation, the legs are on the straight grain of the fabric. You would cut the strip the width of the leg.
In the second orientation, the hypotenuse is on the straight grain and you would cut the strip the narrower width. Refer to the Strip Charts on the inside covers of Volume 1 and in More Bang for the Buck for strip widths.
Cutting parallelograms is similar to cutting the larger triangles. Make the first diagonal cut. Then rotate the template and align it with the straight edges of the strip so the corner angles fit in place with the first cut you made. Make the second diagonal cut.
There are a few points that need very careful attention when working with "fake diamonds."
- Be careful about eliminating too many seams and creating the need for set-in pieces.
- To cut matching parallelograms, multiple layers of fabric must face the same direction (right side up or right side down) because fake diamonds are asymmetrical.
- Double-check your cutting plan to be sure the points will be in the right position for your block. Make some sample cuts to confirm this before cutting everything for a quilt. Stripes and directional fabrics are most critical to test.
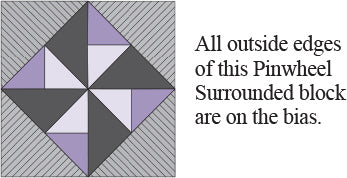
Working with Directional Fabrics
Directional fabrics may override some grainline decisions. For example, some outside edges may be on the bias so the stripes fall where you want them. Just pay a little more attention when sewing those edges.
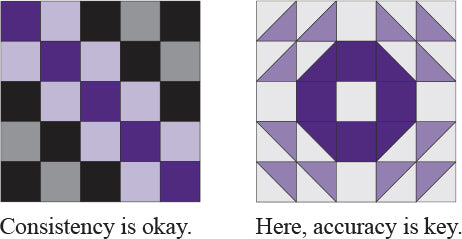
The Secret to Perfect Patchwork
With strip-technique quilts, consistency in your seam allowance is enough. With a block like the one below left, it would not matter if your seam allowance were a little larger or a little smaller than ¼″. The quilt would just be a little larger or a little smaller than you had planned, but the pieces would still fit together. Things change when you move to actual-size templates with varying shapes and angles. Now, the key to sewing perfect points and blocks that are all exactly the same size is in the seam allowances.
You must know how to sew an exact ¼″ (6 mm) seam allowance. From Marti Michell Perfect Patchwork Templates are designed so that you can cut fabric shapes with corners that match for easy, accurate piecing—however, perfect cutting won't make up for imperfect piecing. If you are not sure how your seam allowance measures up, try the following and use the method that works best for you—and then practice until you are able to sew accurate ¼″ seams consistently.
Tips for Sewing Perfect ¼″ Seams
Use the Presser Foot as a Seam Guide. On some sewing machines, the distance from the needle to the right edge of the standard presser foot is ¼″. Test yours by aligning the right edge of the fabric with the right edge of the foot and sew a test seam. If your seam width measures ¼″ you can use your presser foot as a seam guide.
Adjust the Needle Position. If your machine has this feature, adjust the needle position to the left or right, one notch at a time, and sew a seam each time, using your favorite method of alignment. When your seam allowance measures ¼″ exactly, make a note of the machine's coordinates (which are likely to be in centimeters) so you can dial up this needle position every time you piece.
Make a Seam Guide. Draw a line on a piece of paper ¼″ from the edge, or use graph paper. With the seam allowance on the right, place the paper under the presser foot, bring the needle down through the line and release the presser foot. Build up several layers of masking tape and align the edge of the tape with the edge of the paper, pressing in place to the right of the paper. You can use moleskin foot padding in place of tape. In either case, test drive your seam guide to be sure it's stuck on straight by sewing through the paper, with the right edge of the paper against the seam guide. If you sewed on the pencil line, you have a perfect ¼″ seam guide. If you didn't, reposition the seam guide and try again until it's right. Then test it on fabric, just to be sure!
Purchase a ¼″ Presser Foot. Ask your sewing machine dealer or quilt shop owner about a special foot. Have your make and model number ready, as they will ask if you have a short or long needle shank.
What About Metric?
I measure in inches; my sewing machine uses the metric system to adjust the needle position. I have determined what combination of numbers creates a ¼″ seam allowance and I use those settings every time. I've been told that many quilters who measure in metric prefer a 5 mm or 7.5 mm seam allowance to 6 mm, which is the closest to ¼″. However, since the Perfect Patchwork Templates include ¼″ seam allowance, you must sew a 6 mm or ¼″ seam allowance for the pieces to fit together properly.


