Perfect Patchwork Bindings
Perfect Patchwork Bindings
Excerpted from Quilting for People Who Still Don't Have Time to Quilt (see pages 188-189)
My favorite binding is a separate French-fold binding, cut on the straight grain. The corners are blunt, not mitered.
In general Strips are cut four times as wide as the desired finished width plus 1/2 inch for two seam allowances, plus 1/8 inch to 1/4 inch more to span the thickness of the quilt. The fatter the binding, the more you need to allow here. The most common finished width is 1/2 inch, or 2 5/8 inches cut width.
Add binding strips to the sides first then top and bottom.
If you are hemming the binding by hand, attach the binding to the quilt front and turn it to the back. If you are hemming by machine, attach the binding to the quilt back and turn it to the front to stitch with invisible thread.
Before adding the binding, stabilize the edges of the quilt by machine basting 1/4 inch from the raw edge of the quilt top on all sides of the quilt.
French-fold Binding
1. Fold the binding strip in half lengthwise with the wrong sides together and the raw edges even. Press.
2. Lay the binding on the quilt so that both raw edges of the binding match the raw edge of the quilt top, and machine stitch in place through all layers.
3. To determine how much excess batting and backing to trim away, pull one section of binding flat so it extends onto the excess batting. Because I like full-feeling bindings, I trim the backing and batting to be almost as wide as the extended binding. In other words, the extended binding will be about 3/16 inch wider than the trimmed backing and binding.
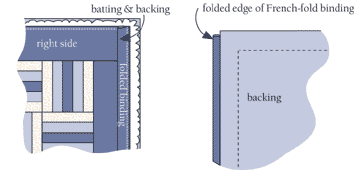
Assuming you wanted a 1/2 inch finished binding and you started with a 2 5/8-inch-wide binding strip and are measuring from the seam, not the edges of the binding, the batting and backing would be trimmed 7/8 inch from the seam line, or 5/8 inch from the edge of the quilt.
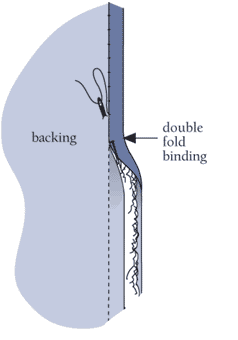
4. Roll the binding around the raw edges of the quilt to the back, and hand stitch in place using the row of machine sttching as a stabilizer and a guide.
The hand hemming stitch I use is hidden. The needle comes out of the quilt, takes a bite of the binding and re-enters the quilt exactly behind the stitch. The thread is carrie din the quilt's layeres, not on the outside.
5. To make blunt corners, complete the hand stitching on the sides of the quilt before beginning the end bindings. Trim batting out of the last 1/2 inch of binding befroe completing the hand stitching.
6. Measure the quilt ends for binding strips, and add 1/2 inch to each binding end. To eliminate raw edges, turn under the ends of the strips before folding the strips in half lengthwise. Continue in the same manner as above.
7. Complete the hand stitching for the ends of the quilt. At the corners, trim away enough batting and seam allowances to make the corners look and feel the same thickness as the rest of the binding. Carefully stitch ends shut.


